
Night sky photography is no longer just for professionals with bulky DSLRs. With powerful sensors and smart features, your iPhone is more than capable of capturing dazzling stars, constellations, and even the Milky Way. If you’ve ever looked up and wondered how to take pictures of stars with iPhone, this guide will walk you through every step—from setup to final edit.
This isn’t just another “point and shoot” tip list. We’ll explore ideal locations, best settings, essential gear, and pro-level apps to make your iPhone a star-shooting machine. Whether you’re capturing a meteor shower or the glowing band of the Milky Way, this guide has your back.
Recent iPhone models like the iPhone 11, 12, 13, 14, and 15 (especially the Pro versions) come with Night Mode, which uses intelligent long-exposure processing to brighten dark scenes. Night Mode kicks in automatically, but you can control the exposure length—up to 30 seconds in optimal conditions.
If you want to truly understand how to take pictures of stars with iPhone, you need to go beyond auto settings. iPhones 12 Pro and above support Apple ProRAW, giving you full control over post-processing and detail recovery. You’re not just using a phone—you’re holding a legit night photography tool.
Star photography is all about darkness. To maximize your chances, shoot during a new moon or when the moon is well below the horizon. Avoid city lights, as light pollution drowns out stars. Apps like Light Pollution Map, Stellarium, or Sky Guide can help you find the perfect stargazing spot.
Travel a bit to escape urban glow. Even 20 minutes outside a city can drastically improve sky visibility. If you’re serious about how to take pictures of stars with iPhone, location is everything. For best results, aim for clear skies, high elevations, and absolutely no streetlights nearby.

Your iPhone is powerful, but it needs support. A tripod is non-negotiable for long exposures—any movement ruins the shot. Use a Bluetooth remote or set a 3- or 10-second timer to avoid shaking the phone when pressing the shutter.
Consider using a clip-on lens for wider angles or a star tracker if you want to get serious about long star trail exposures. Even household hacks work—prop your phone on a stable surface with books if you don’t have a tripod. Remember, stabilization is key when learning how to take pictures of stars with iPhone.
Want pro-level shots? Use the iPhone’s manual controls or third-party apps like Slow Shutter Cam, NightCap Camera, or Halide to unlock hidden features. These apps let you manually control ISO, shutter speed, focus, and white balance.
- ISO: Set to the lowest possible (e.g., ISO 50–200) to reduce grain.
- Shutter speed: Use long exposures—start at 10 seconds and go up to 30 if the app and conditions allow.
- Focus: Set manually to infinity or use the stars as your focus guide.
iPhone Night Mode does a decent job automatically, but if you want creative freedom, these apps give you full control over how to take pictures of stars with iPhone like a pro.
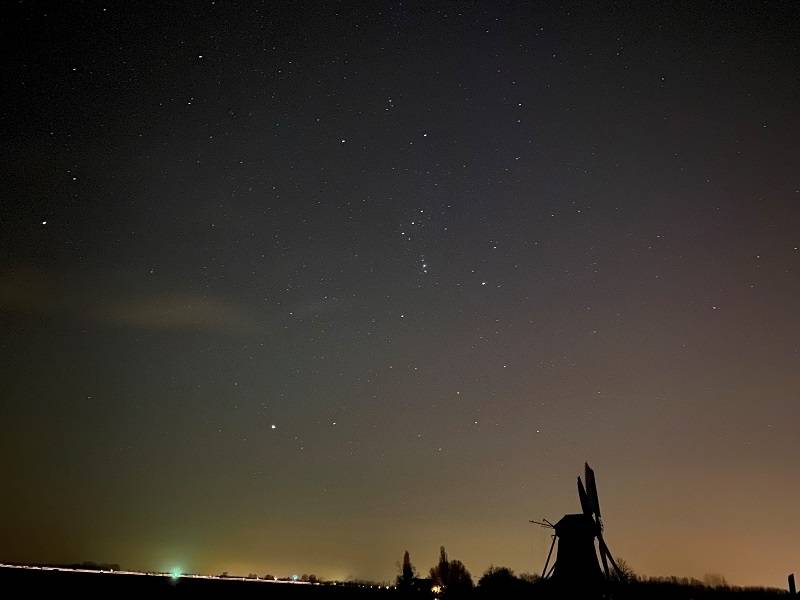
Don’t just point your phone up and click. Use the rule of thirds to frame the sky against a mountain ridge, silhouette of trees, or a tent for storytelling. A great star photo needs contrast and context.
Once everything is framed, set your timer or remote trigger, then stay still. Let the iPhone do the work. Even the slightest motion will blur the stars. For longer sessions, consider taking multiple images to stack later, which helps reduce noise and bring out more stars.
After capturing your photos, it’s time to edit. Apple’s Photos app is a good start, but for real impact, use apps like Lightroom Mobile, Snapseed, or Darkroom. You can fine-tune exposure, contrast, color temperature, and reduce noise.
Want the stars to pop? Adjust the clarity and dehaze sliders, lower the blacks, and boost highlights carefully. This enhances the contrast between stars and the night sky. If you shot in RAW, your editing potential skyrockets. This is where the magic happens and how to take pictures of stars with iPhone really turns into art.
Yes, you can capture the Milky Way with an iPhone, especially if you’re in a dark rural area. Use a 30-second exposure and shoot in RAW to bring out the galaxy’s subtle glow. Apps like Photopills or Sky Guide can tell you when and where the Milky Way will be visible.
For star trails, capture a series of long-exposure shots and stack them using editing software like Photoshop or apps like StarStax (desktop). This advanced technique shows the Earth’s rotation and creates a mesmerizing spiral of light in the sky—all done with an iPhone.
- Pick a dark, rural location with low light pollution.
- Shoot during a new moon or after moonset.
- Use a tripod and timer for stability.
- Download manual camera apps for advanced control.
- Set ISO low, shutter speed high (20–30s), and focus to infinity.
- Frame with foreground interest for drama.
- Edit in Lightroom or Snapseed to bring stars to life.
Now that you’ve unlocked the secrets of how to take pictures of stars with iPhone, the universe is literally at your fingertips. With the right planning, apps, gear, and patience, your smartphone becomes a gateway to astrophotography that’s both powerful and portable.
Don’t be afraid to experiment and fail—star photography takes practice. But each clear night is an opportunity to capture a glimpse of the cosmos and tell your own story in pixels and starlight. Your iPhone is ready. Are you?
Can I really shoot the stars with an iPhone?
Absolutely. With models from iPhone 11 and up, you can capture stunning night sky photos using Night Mode or third-party apps.
Do I need to buy anything extra?
At minimum, a tripod is essential. Apps like Slow Shutter Cam and a Bluetooth remote are helpful but optional.
Why are my star photos blurry?
Most likely, your phone moved during the exposure. Use a tripod and timer to keep it steady.
Can I shoot the Milky Way with iPhone?
Yes—go to a dark location, use a 30-second exposure, shoot in RAW, and do some post-editing to bring it out.
Is RAW format necessary?
Not necessary, but recommended. It gives you more flexibility in editing and preserving details.
You may also read: Monica Keasler Photography – What Really Happened with Peanut the Squirrel?